Vue Server-Side Paging with jQWidgets
In this tutorial, we will create a Server-Side Paging for jqxGrid.
With the Node.js we will handle our queries and get the data from the familiar Northwind database. For this purpose, we need to include a few plugins to achieve that we want - like express and mysql. We assume that this tutorial is known and we will continue from this position with the next steps.
Getting Started
The next step is to install the desired plugins. For this purpose, we open the terminal and navigate to the root of the current project.
I. Let's install the express package. In the terminal use the command below:
npm install expressII. Install the mysql package. Enter the following command:
npm install mysqlReview of the current state
The package.json file should have dependencies for the newly added plugins.
How to create it you can look at this.
Start our XAMPP server
We need to connect with our database.
In our tutorial, we will use the Northwind database.
For this purpose we will use the XAMPP with the same success we could use WAMP, too.
Here we will skip the steps of the installation of these platforms because we assume that this is known already.
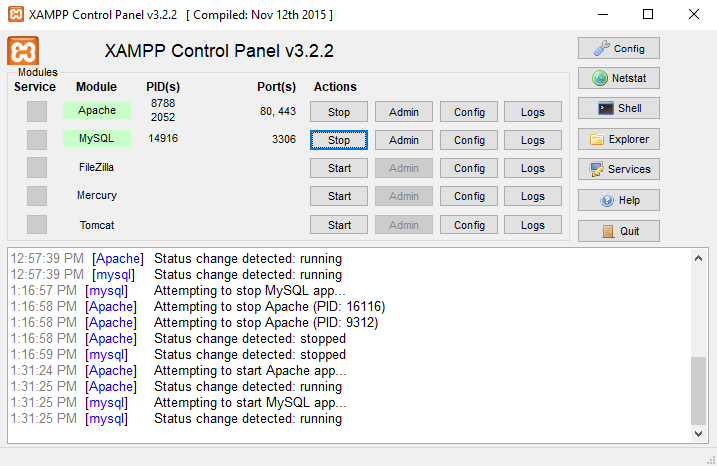
We need to start the first two options - Apache and MySQL. This is enough to proceed with the next steps.
Server-Side - Handling requests with Node.js
The prepared example with jqxGrid will make requests to the server with a bunch of extra arguments.
Important for us now are pagenum and pagesize because we make a Server-Side Paging scenario.
Create the file
We have to take and process these requests.
For this, we will create a server.js file that will handle our requests from the jqxGrid.
This file in our application will be created at the same level as the root of the Vue project start - ./my-app/server.js.
With the help of the Node.js, we will start the server and handle the queries to the database.
Including libraries
Open the server.js file and after that include the express and mysql:
// server.js

const mysql = require('mysql');
const express = require("express");
Prepare Express
Now we should create our small internal application from Express - it will be something like a middleware. Let's create it on that way:
const app = express();The Express is useful for handling the routing. We will use it to process our URL requests from the jqxGrid. More details about this you can find on the official site.
Configuration of the connection to the server
Firstly we should connect with the database.
Let's add this to the server.js file:
Note: Configuration to the database could vary.
Routing
What are Routes?
It determinates the way that one application response to the client's requests to a particular endpoint.
As we mentioned before the extra HTTP variables are pagenum and pagesize.
The request will look like that:
.../getdata?pagenum=0&pagesize=10
That will be the initial request state of our jqxGrid.
The view will be on the first page and the number of records on the page are 10.
As we mentioned we should handle a simple case of Client-Side request.
In the next step we should include the code below in the server.js file:
As we can see our simplified server application is listening on port number 3000. We handle the CORS situation as we enable all requests. More details about this can be found on this page.
Note: We know what happens on the server-side and the client-side and also this tutorial has another purpose. However, in another case, you should be careful with this situation.
What we achieved for now?
We handling routing case where we will make requests to our server. It will start in the following way:
http://localhost:3000/getdata
In the example above you can see that we extract the extra HTTP variables - pagenum and pagesize.
After that, we can use them to make the desired QUERY to our Northwind database.
If we look at our URL with pagenum and pagesize should look like this:
http://localhost:3000/datainfo?pagenum=0&pagesize=10Make a Query
The SQL queries are one powerful option to get data from the database in the desired size. We suppose that this should be a known knowledge and directly we will go to create a query. It will be tailored to our case. If it is necessary some clarification or it is a new thing then you can look into these resources.
Continuing with the server.js file where we already created a connection to the database and with the query method,
we will make our SQL query.
We receive data with these queries and to send it the client-side as a JSON object we use the response object to return the data.
res.json({ "TotalRows": result[0]["totalrows"], "Rows": records });On the client-side, we receive a JSON object with a "Rows" key as an array of rows and another "TotalRows" key with a value of count all records in number type.
The Node.js Server source
The content of the server.js file should look like as this below:
Client-Side - Creating jqxGrid with Paging
We have a lot of examples in our Vue demos section, especially for the jqxGrid.
Which can be used to create the desired structure and to use the most suitable approach for us.
Also, we suppose that we already are familiar with the Create jQWidgets Vue App tutorial.
Based on these points we will start directly with the editing of the App.vue file.
Open it and replace its content with the following:
With every change of the page number or position, we make a new request to our Node.js server that we already handled above. It responds with a specific data segment.
Summary
We use a lot of different technologies to achieve Server-Side Paging.
- XAMPP - to connect to the MySQL with the Northwind database
-
Node.js - to create a simplified server application
- express plugin - handling different routes
- mysql plugin - for SQL queries to the database
- Vue.js - our Client-Side wrapper
- jqxGrid - visualize the data from the database
Required Final Steps
We should run everything and we should have one fully working jqxGrid Vue example with Server-Side Paging. The XAMPP should be launched as we described before.
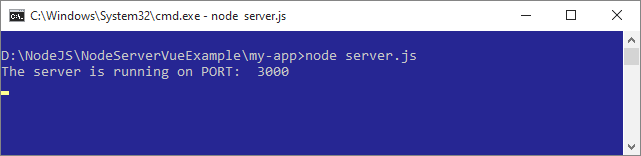
The next step is to run our Node.js server. Open the terminal with the root directory of our application and type:
node server.js
This will execute our server.js file and our server will run.
Now we should open another terminal with the root (the same) of our Vue project. Type the familiar command:
npm run serve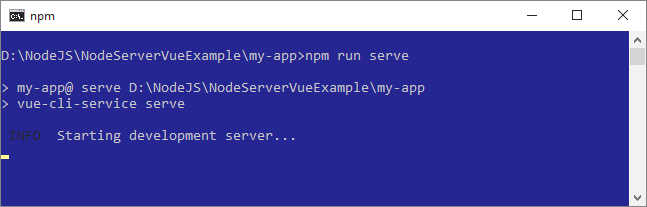
This should run our Vue project as follow:
App running at:
    - Local:   http://localhost:8080/
    - Network: http://192.168.1.108:8080/
Final Result
